• The Nuclear Family
    • Kids and Family
    • Mothering
    • Marriage
    • Neighboring
  • Self-Sufficiency
    • Hunting
    • Foraging
    • Self-sufficiency
  • Money-Saving
  • Side Hustles
    • Facebook Marketplace
  • Productivity
  • In The Kitchen
    • Breakfast
    • Dinner
    • Side dishes
    • Snacks
A Productive Household

A Productive Household

Recovering the family that creates value together

  • Blog
  • About
  • Shop
  • Contact

First Year Raising Meat Chickens: What We Learned

Self-sufficiency, Self-sufficiency

Tweet
Share
Pin5
5 Shares

Interesting fact about us: we do not love chickens. I know they’re all the rage right now, but honestly, we just don’t get the appeal. Chickens are…kind of gross. And it’s very difficult (if not impossible? but please correct me if I’m wrong!), to spend less money feeding and keeping layers than you can make selling eggs. Anyway, all that to say, raising meat chickens was another story! They’re still kind of gross and only cute for the first week or two, but we felt like the reward of this project was well worth it. Here are a few things we learned during our first year raising meat chickens!

First Year Raising Meat Chickens What We Learned

3 Things to Know About Raising Meat Chickens

During our first year raising meat chickens, some of the most important lessons we learned were these:

  1. Choose the right breed
  2. Buy or build a safe, portable chicken tractor
  3. Think through your processing plan in advance

What breed of meat chickens is best?

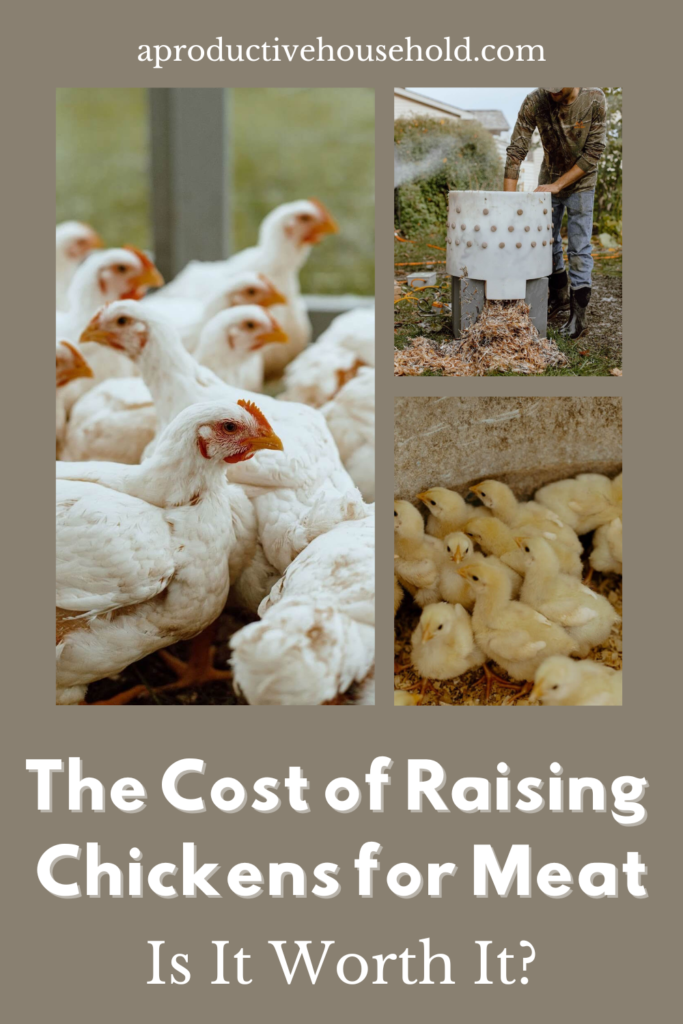
While Cornish Cross are some of the most popular meat chickens, we chose to raise Freedom Rangers. Cornish Cross are popular mainly because they grow very quickly. They’re generally ready for processing by 6-8 weeks.

Freedom Rangers grow a bit slower, but tend to have a lot less health problems than Cornish Crosses. They’re great foragers (eating more nutrients, which in turn go to your plate!), and the risk of serious injury or death is much lower than with other breeds. Cornish Crosses commonly suffer from heart attacks and broken legs, which generally aren’t a problem with Freedom Rangers.

We raised our Freedom Rangers for 10-12 weeks. The roosters were ready at 10 weeks, while the hens needed a couple more weeks to grow. When packaged and ready for the freezer, most of them weighed about 5-6 lbs.

We purchased our birds through Freedom Ranger Hatchery.

What kind of chicken tractor is best for meat chickens?

The top qualities that we really appreciated in our chicken tractor are a sturdy base made with 2x4s, enough space for 25+ birds, ease of mobility, and a wide enough door for us to easily fit through.

We were fortunate to be able to find a great deal on a chicken tractor on Facebook Marketplace, but you could easily build one yourself, too!

We started out by keeping our birds in a large, metal trough inside the chicken tractor with a heat lamp. This kept them warm enough and protected from predators. When they started jumping onto the edges of the trough after a few weeks, we took it out and let them have the full space. At this point, we moved the tractor generally every two days.

Check out how the grass looks now on the spaces that were most-used by the chickens! They are seriously amazing at fertilizing! Moving them often also allowed them to have clean ground and to get plenty of extra nutrition from foraging the new spaces.

How much space do meat chickens need?

2 square feet per bird is the recommended amount of space for keeping meat chickens.

Think about your processing plan in advance

Finches processing chickens

If you plan to take your birds to a processor when you’re finished raising them, you’ll definitely want to get this on the calendar WAY in advance. A lot of processors are booked months out, and you don’t want to get stuck with a bunch of birds and no plan (or have to wait too long and watch your birds have heart attacks). In addition, make sure you know the current cost of processing, especially if you plan to sell any of your birds (like everything, it tends to increase!).

We processed our birds at home, so fortunately we didn’t have to plan too far in advance. Other than renting a plucker, we were able to do the rest with basic supplies.

As a side note, we TOTALLY recommend renting a plucker! It saved a ton of time! We’ve processed chickens with my parents before, and plucking them by hand always takes forever.

chicken plucker

Supplies you’ll need to process your meat chickens at home:

Here’s what we used to process chickens in the backyard:

  • Sharp knives. You’ll need knives for both killing and gutting.
  • Kill cones. We found that kill cones worked well. They hold the chicken upside down while you cut the carotid artery.
  • A large pot for boiling water.
  • Propane burner – for heating the water
  • Thermometer. You’ll want the water to be between 130* and 170* for dunking your chickens before plucking them. We scalded ours for 30-60 seconds. Too short, and they won’t pluck. Too long, and the skin will start to break.
  • A tall table or surface. Make sure you have a surface tall enough that you can comfortably cut birds on it without bending over too much.
  • Cutting boards.
  • A large cooler. We kept our birds in a cooler filled with ice water until we were finished and ready to bag them all.
  • Ice for the cooler.
  • Large Ziplock bags or a vacuum sealer.
  • A hose or two. You’ll need a water supply for rinsing birds and for your plucker, if you choose to rent one.
  • Buckets or cardboard boxes. Keep a few buckets or boxes handy for throwing feathers and other discardable parts into.

What’s the cost per bird of raising meat chickens?

After everything was said and done, it cost us approximately $11.50 per bird to raise our 25 meat chickens. This included the cost of the chicks, feed, and processing at home. Each bird weighed approximately 5-6 pounds processed.

Here’s the breakdown of our cost:

  • Chicks – $1.80 x 25 = $45
  • Shavings – $7.50
  • Broiler feed – $210
  • Chicken plucker rental – $25
  • Total cost – $11.50 per bird

The cost of having healthy chickens and knowing exactly what went into them was well worth it!

What questions do you have about raising meat birds?

Have you been wondering whether or not you should raise your own meat birds?

We loved our experience raising these birds and look forward to doing it next year and learning more!

What questions have been holding you back from raising your own meat birds at home?

Related posts:

is hunting for meat more cost-effective than buying it pinterest
how to make your home more self-sufficient
Tweet
Share
Pin5
5 Shares

March 17, 2023 · Leave a Comment

Subscribe to get the latest

By subscribing to our newsletter, you consent to receive new post updates and occasional promotional emails related to our company.

Previous Post: « 7 Reasons to Pay Cash for Your Vehicles (and How to Do It)
Next Post: How Many Eggs Does a Chicken Lay Each Day? »

Reader Interactions

Leave a Reply Cancel reply

Your email address will not be published. Required fields are marked *

Primary Sidebar

Let’s Connect

  • Email
  • Instagram
  • Pinterest

We’re glad you’re here!

Hello! We’re the Finches. We’re here to share what our family is learning about using our time to create value through the homefront. Join us!

You can read more about us here.

never miss a post!

By subscribing to our newsletter, you consent to receive new post updates and occasional promotional emails related to our company.

Latest on Instagram

aproductivehousehold

aproductivehousehold
It’s been a minute! Lots of growing has been goi It’s been a minute! Lots of growing has been going on over here. Gardens, chickens, and mostly kiddos. 🤪

In the last few weeks we’ve lost 50+ chickens and caught 6 raccoons. Those creatures are SMART. Needless to say we’ve learned a lot already this year! And fortunately I think we’ve finally outsmarted them and have growing birds. 🐓

Check out our latest blog post to read about what we learned last year raising meat birds! No raccoons were involved. 🦝 Link in bio.

#meatchickens #broilers #cornishcross #aproductivehousehold #raisingchickens
The other day, I spent the afternoon making yogurt The other day, I spent the afternoon making yogurt and baby food and homemade lemonade while listening to @dr.ashleyturner , and I couldn't help thinking about what a gift it is to be constantly learning.

Especially during this time of year, it’s easy to become overwhelmed by how MANY opportunities there are. There is so much that I could learn, cook, preserve, do. So many people offering free vegetables that I could do something with. 😂

But time and resources are limited, and that is okay! It’s okay to say no to things that may be good but not BEST.

I’d love to make pickles, but there are other foods that my family eats more and would be a better use of my time. 

I’d love to grow all the fall crops, but I don’t have the space or time.

I’ve become totally okay with saying no to some opportunities and not feeling guilty. There are always more opportunities to learn and grow. 

Do the next thing and keep learning a little each year!

#aproductivehousehold #homemadebabyfood #homemadeyogurt #foodpreservation #onethingatatime
10-MINUTE DATE ENERGY BARS I'm always looking for 10-MINUTE DATE ENERGY BARS

I'm always looking for healthy snacks that we can take in the car or that I can feed to the kids quickly without making a mess (or with minimal mess at least). 

I made these date bars the other day with some of our favorite ingredients, and they were so easy. I actually made them out of slight desperation and laziness because I was so tired of rolling peanut butter energy bites into balls. (Does anyone else make these and extremely dislike a bunch of messy, sticky peanut butter on your hands?)

Anyway, I wanted to share the recipe with you here!

10-MINUTE DATE ENERGY BARS 

Ingredients:

1 cup dates
1/2 cup apricots
1/2 cup sunflower seeds
1/2 cup walnuts
2 Tablespoons chia seeds
1 teaspoon cinnamon

To make:

1. Add all ingredients to a food processor and pulse
2. Line a 9" x 9" pan with parchment paper
3. Press mixture into pan to form into a square
4. Lift parchment paper out of pan to cut energy bars
5. Store cut bars in a plastic container in the refrigerator (use strips of parchment paper between the layers to prevent sticking to each other)

That's it! Let me know if you try them!

I also posted this on the blog with more ingredient ideas. I love that you can totally use whatever ingredients you have or like best, just as long as there's enough dried fruit to make them really stick together.

https://aproductivehousehold.com/10-minute-date-energy-bars-no-sugar-added

#dateenergybars #nosugaraddedsnacks #healthysnacksforkids #healthysnacks #homemadesnacks #datebars #energybars #easysnacks
"Let us, then, be up and doing, With a heart for a "Let us, then, be up and doing,
With a heart for any fate;
Still achieving, still pursuing,
Learn to labor and to wait."

from A Psalm of Life by Henry Wadsworth Longfellow

Our green beans were struggling this year, so we started a few more a week or so ago. They're growing well, so hopefully we get some green beans after all!

What part of your garden is doing the best? Did anything you planted not work out this year?

#longfellow #poetry #aproductivehousehold #planting
I am too excited about these pillow covers. I've I am too excited about these pillow covers.

I've been wanting to replace our old, non-matching throw pillows for months (years?), but geez, pillows are expensive! And that's just not something I was excited to spend money on.

Instead, I found the simplest, most forgiving way to make throw pillow covers. I literally forgot my measuring tools in the kids' rooms while they were asleep and eyeballed the cuts on a bunch of these, and they still turned out great. 

And the best part was that I made all 7 of them for about $20 total! 

They were so easy and so fast and so cheap, and I am way too stoked on throw pillow covers now.

Here's the pattern if you want to make any yourself! ⬇️

https://aproductivehousehold.com/how-to-make-pillow-covers-without-a-zipper

(or just click the link in our bio)

#diythrowpillowcovers 
#diypillowcovers 
#nozipperpillowcovers #envelopepillowcovers 
#envelopethrowpillows
#handsewnpillowcovers #aproductivehousehold
#homemakingonabudget
We’re out in the country enough that we have no We’re out in the country enough that we have no phone service or internet when we’re in our yard.

I love being able to go outside with the kids and not have to even think about my phone going off. It feels so great to be able to just play with them and not be interrupted by notifications, and the kids definitely feel the difference too.

What do you find are some of the best techniques for using your phone as a tool versus a constant distraction during the day? 

I’ve been working on being very intentional about what I’m doing; only getting on when I have a good reason (though this does not always happen). Also, leaving it in one spot until I really need it rather than carrying it around the house.

Anything else that works really well for you?
Load More Follow on Instagram

Copyright © 2023 · Anchored Theme on Genesis Framework · Privacy Policy · WordPress · Log in