How to Make Easy DIY Pillow Covers with No Zipper
I don’t think I’m exaggerating when I say that we’ve had some of the ugliest pillows on our couches for way longer than I care to admit. I’m probably too frugal when it comes to decorating, but I just couldn’t bring myself to spent $100 or more on a set of nice, new pillows. Fortunately, there’s a WAY more cost-effective way! In this post, I’ll show you how to make your own DIY, no-zipper pillow covers. It’s incredibly easy and so cheap!

This post contains affiliate links, which means that we make a small commission at no extra cost to you. You can view our full disclosure here.
Why Make an Envelope Pillow Cover?
I’ve wanted to look into making pillow covers for our super ugly pillows for a long time. However, I’m by no means an expert at sewing, and I don’t have a ton of time to spend on it. So I was really hoping to figure out a way to make a DIY pillow cover that would be super simple and wouldn’t require sewing zippers or adding button closures.
Enter the envelope pillow cover!
Making a pillow cover with an envelope closure might just be the easiest way to totally transform your pillows. It doesn’t require any special tools or supplies. You don’t need a zipper, zipper foot, buttons…nothing fancy! Just some fabric, thread, and a sewing machine.
And it’s very, very forgiving. Plus, an envelope pillow cover can be made in less than a half hour. Lastly, they’re super simple to take off and wash (as long as your fabric is machine washable, of course).
I actually made the mistake of forgetting my measuring tools in the kids’ rooms after they were asleep while I was making some of these. I literally eyeballed the cuts, and they still turned out great. You do NOT have to be a perfectionist to make these.
I hope this easy step-by-step tutorial is helpful to you in transforming your old pillows or just giving your room a fresh look!
Before and After of Our Pillows
If you’re dying to see just how ugly our living room pillows were before, here you go!
Before

After
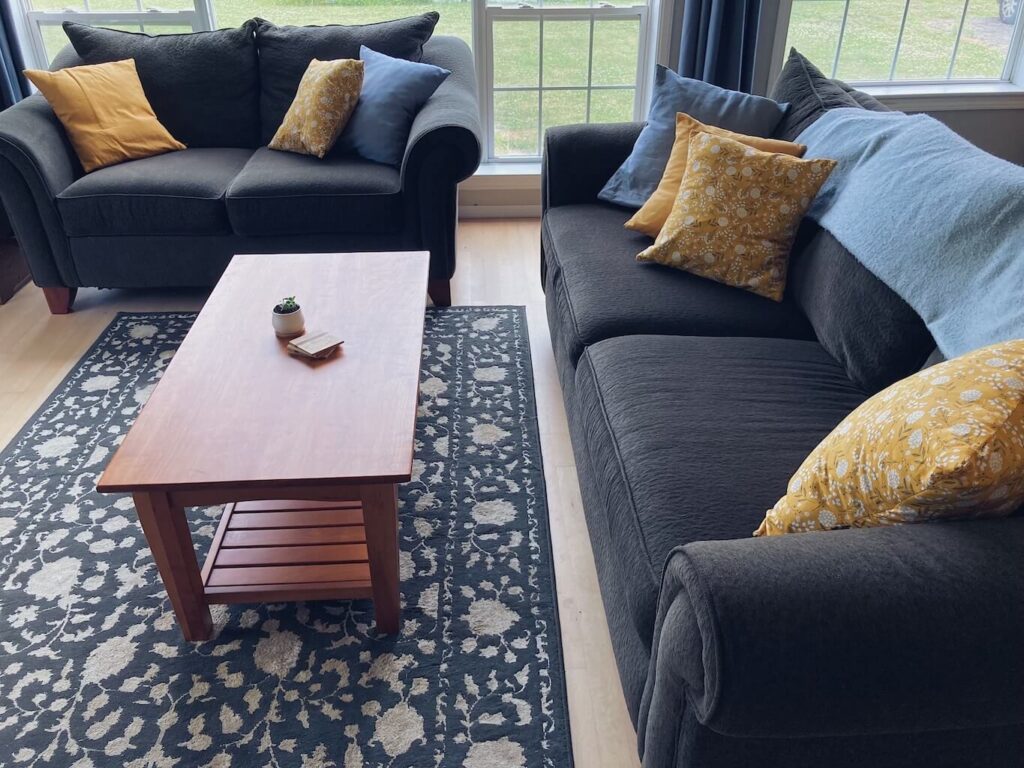
The covers make all the difference in this space! It’s crazy how much pillow covers can change the look of a room.
How Long Does It Take to Make DIY No-Zipper Pillow Covers?
These pillow covers take about 30 minutes to make for each one. They’re a perfect project for beginners or anyone who wants to complete a quick pattern.
I actually made these on four different evenings, so I had to get my sewing supplies out and put it all away a bunch of times. I’m sure you could do these even more quickly if you were making a whole bunch at once.
How Much Does it Cost to Make a Throw Pillow Cover?
These envelope pillow covers cost about $3 per pillow for medium-sized pillows. If you already have old pillows (or have access to inexpensive pillows that are the wrong color – hello, thrift store pillows), this is a huge savings! You can also buy an inexpensive pillow insert almost anywhere (Amazon, Target, Walmart, etc.) to fill these DIY throw pillow covers.
I’ve been staring at our ugly pillows for so long, never able to bring myself to spend $20+ each on new throw pillows. Instead, I spent about $20 total for covers (that I love) for 7 pillows that I already had!
Other Uses for An Envelope Pillow Case
I love that these super easy pillow cases are so affordable and great for covering up ugly pillows, but that ‘s not the only use for them! They’re also an easy way to change up the look of your room for different seasons or if you’re just ready for a new look. You can totally create seasonal pillows that are custom-made for spring, summer, fall, and winter, or even for holidays. They’re seriously so easy to make and switch out, so why not?
Handmade pillow covers are also a great way to use up extra fabric, since they only take about 3/4 of a yard each for a medium size pillow.
You could also totally make this envelope design for square cushion covers.
Skills Needed for DIY No-Zipper Pillow Covers
This DIY project is perfect for beginners and such a great way to make a big difference in your decor even if you haven’t been sewing for long. To make this pattern, you’ll need to know how to:
- Take basic measurements
- Pin right sides together
- Sew a simple hem
- Seam pieces together
…and that’s about it! Seriously, if you can cut fabric, measure, and sew simple seams in a straight line, you can do this project. It’s one of the easiest things you can do to make a big impact in your space.
Materials Needed
Here’s what you’ll need to make your pillow covers:
- Fabric (approximately 3/4 yard for each medium-sized pillow)
- Sewing machine, thread, and pins
- Pillow form, or old pillow
- Fabric scissors
- (optional) Foldable superboard
How to Make DIY No-Zipper Pillow Covers
I hope you enjoy this simple tutorial for transforming your own pillows!
Step 1: Measure your pillow
Take measurements of the length and width and write down the size of the pillow.
Step 2: Cut 2 pieces of fabric
The first piece should be the dimensions of your pillow plus 2 inches. So, if your pillow is 16″ x 16″, cut this square to 18″ x 18″. This piece will make the front side of your pillow.
The second piece should be the dimensions of your pillow plus 2″ on one side and 8″ on the other side. For a 16″ x 16″ pillow form, cut this piece to 18″ x 24″.

(As you can see, I was seriously eyeballing some of these!)
If your pillows are super fluffy, you might want to consider adding an extra inch to each side to make sure you have enough fabric to fully envelope it.
Lastly, cut the larger piece of fabric in half. For the example above, this would give you two pieces that are each 18″ x 12″. These two pieces are the back panels and will fold over each other to make the back of the pillow cover.

Step 3: Sew a hemline on the back pieces
The next step is to sew a 1/4″ hemline on one of the long edges of each of your smaller, back pieces. (This would be the 18″ side in the example above.) These pieces will show on the back of your pillow.
Step 4: Pin the front and back pieces together
With right sides together, lay your two short pieces (back panels) on your one larger piece (front panel) and pin around the edges. The hems of the smaller pieces should be overlapping (this is what makes your envelope).
If your fabric is patterned, make sure all of the pieces are facing the same direction.

In this picture, I have my bigger piece on the bottom and my two shorter pieces overlapping on top. Notice the hemlines are already finished. Right sides are together.
Step 5: Sew around the edges
Sew around all 4 edges, using about a 1/4″ seam allowance.
Step 6: Add your pillow form
Lastly, flip your DIY throw pillow case inside out, and stuff your old pillow or pillow form inside. You’re done!

Enjoy Your New Pillows!
Once you’ve done this project once, it’s so tempting to keep making these super easy pillow covers for all of the pillows in your house! You can totally experiment with whatever different fabrics you have on hand to make your favorite creative covers for each season. It’s such a quick way to change up a room!
I hope you enjoy this easy project as much as I have!
Product links
Pillow form
Fabric scissors
Foldable craft board
Pin this post for later!

Related posts


Thank you! I can’t wait to get home and try to make these!
Wonderful! Enjoy!